Print to Fax Made Easy
The SRFax printer allows you to send a fax from any program to a fax machine using your SRFax account. No Emails, No Logins. It's our direct print to fax driver and it is as simple as printing any document.
Download SRFAX Printer For Windows
(Download the file called SRFaxPrinter.zip. Save this to your computer and open it. Inside there will be a file called SRFaxPrinter.exe. Open this file and follow the simple, onscreen instructions to install your printer.)
*NOTE: This SRFax Printer Driver is only for Windows-Based PC's - for the MAC utility use the SRFax Client for MAC
Using SRFax Printer
1. Sending a Fax From Your Computer
SRFax Printer allows you to send any type of printable document as a fax from your Windows-based PC. To Send a Fax From Your Computer:- Verify your computer's Internet Connection.
- Open the document you wish to send.
- Select "File", then "Print"
- From the Print Dialog, select "SRFax"
- Click the "Print" button
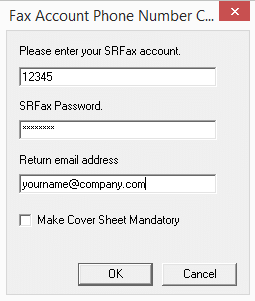
- If you need to change your SRFax Account Details, click on "Change" under "Fax Account Details". You require your SRFax Account Number, Password, and email address. NOTE: You only need to do this the first time as the details you enter will be saved NOTE: If you check the "Make Cover Sheet Mandatory" checkbox, you will be required to add a cover sheet to your fax before being able to send.
- To send a document to one or more fax numbers, enter the 11 digit fax number(s) (starting with a 1) in the field provided. To send to multiple numbers, separate each fax number with a semi-colon (;), or press "Enter" and enter each fax number on a separate line.
- Click the "Send" button to send your fax.
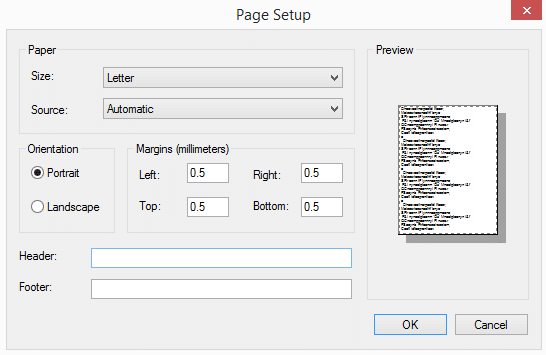
- Open Notepad
- Click on "File", then "Page Setup"
- Make sure the "Header" and "Footer" values are empty
- Set all margins to 0.5mm
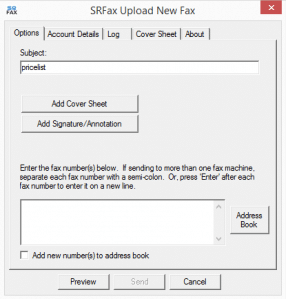
2. Using the Address Book
The SRFax Printer Driver gives you access to your SRFax Address Book To access your address book, click the “Address Book” button located to the right of the fax numbers box.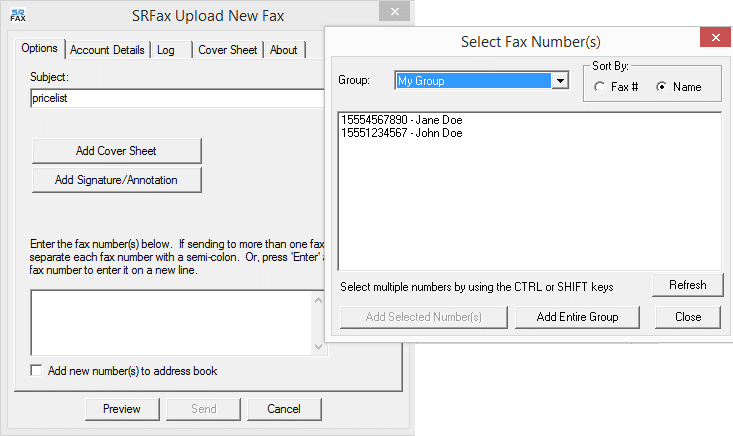 You can switch between your different address groups by, selecting them from the “Group” drop down located at the top.
You can select 1 or more numbers from the list and click on “Add Selected Number(s)”. This will add them to the Fax Number box on the main screen. You can also click “Add Entire Group” to add all the numbers in the currently selected address group to the Fax Number box.
NOTE: By default, your address book list is only loaded once per day and saved on your computer. If you need to get a fresh copy of your address book, click the “Refresh” button located directly above the “Close” button.
NOTE: The Address Book dialog will stay open until you click the “Close” button.
You can switch between your different address groups by, selecting them from the “Group” drop down located at the top.
You can select 1 or more numbers from the list and click on “Add Selected Number(s)”. This will add them to the Fax Number box on the main screen. You can also click “Add Entire Group” to add all the numbers in the currently selected address group to the Fax Number box.
NOTE: By default, your address book list is only loaded once per day and saved on your computer. If you need to get a fresh copy of your address book, click the “Refresh” button located directly above the “Close” button.
NOTE: The Address Book dialog will stay open until you click the “Close” button.
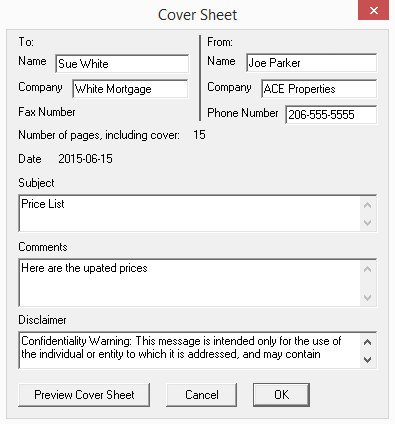
3. Adding a Cover Sheet
Setting up Your Cover Sheet for the First Time- Click on the "Add Cover Sheet Tab" at the top of the window
- Fill in your name, company name, phone number, and any disclaimer information you wish to add (such as confidentiality wording).
- All information added will be automatically saved and will auto-populate into any cover sheet you begin.
- Click the "Add Cover Sheet" button
- Fill the recipient's name, company name, and the document subject. Add additional comments in the "Comments" box.
- Click the "OK" button to return to the main options page.